Day 1: Migrate Customers
As a JobTread specialist, I've seen firsthand the difference that a solid foundation can make in the success of a construction management software rollout. And the cornerstone of that foundation? Your customer data. In this post, I'll walk you through the process of setting up your customers in JobTread, sharing insights and best practices we've learned from our client engagements.
Why Start with Customers?
It may be tempting to jump straight into building out your cost catalog or creating jobs, but trust me, starting with your customers is the best place to start your JobTread setup. Here's why:
- Seamless Integration: By setting up your customers first, you ensure that you're ready to connect JobTread with other critical systems, particularly your accounting software. This is especially important if you're using QuickBooks, as JobTread will look for exact customer name matches to avoid duplicates.
- Centralized Communication: Having all your customer data in one place - including contact information - sets you up for efficient communication. Whether you're sending invoices, updating project statuses, or generating reports, you'll have everything you need at your fingertips.
- Multi-Job Efficiency: Many contractors work with the same customers across multiple projects. Setting up your customers allows you to easily create jobs without needing to double-check all the location and contact information.
Your 5-Step Implementation Plan
Whenever we take a customer through our Complete JobTread Set-Up, these are the precise steps we follow.
Step 1: Cleanup & Update Your Customer Data
Before you dive in to importing customers, make sure that your existing data is accurate by following these steps:
- Clean up your customer data inside QuickBooks. Double check their contact information and addresses. You’ll be using this data to create your customer list.
- Remove any duplicate customers. If you accidentally have duplicates, it’s best to get rid of them now.
- Update your existing customers with their latest contact details or information in case they're missing it.
Step 2: Export Customer Data
QuickBooks offers a simple Export feature where you can download details of all your customers with a single click of the button.
- Once all of your customers are updated, start by exporting your customers out of QuickBooks. This will include essential information such as name, address, phone number, and email.
- The exported data should be in the .csv format.
You can find this in QuickBooks by going to your Customers screen and clicking the Export button.

Step 3: Create Custom Fields in your JobTread & Download the Import Template
Custom Fields is a powerful feature of JobTread that allows you to add custom information to customers. You can use this feature to add as much information required by your company.
We recommend creating custom fields before you import your customers, because you can edit the custom fields in mass inside your Import Template.
Go to your Settings > Custom Fields to add custom fields to your customer accounts.
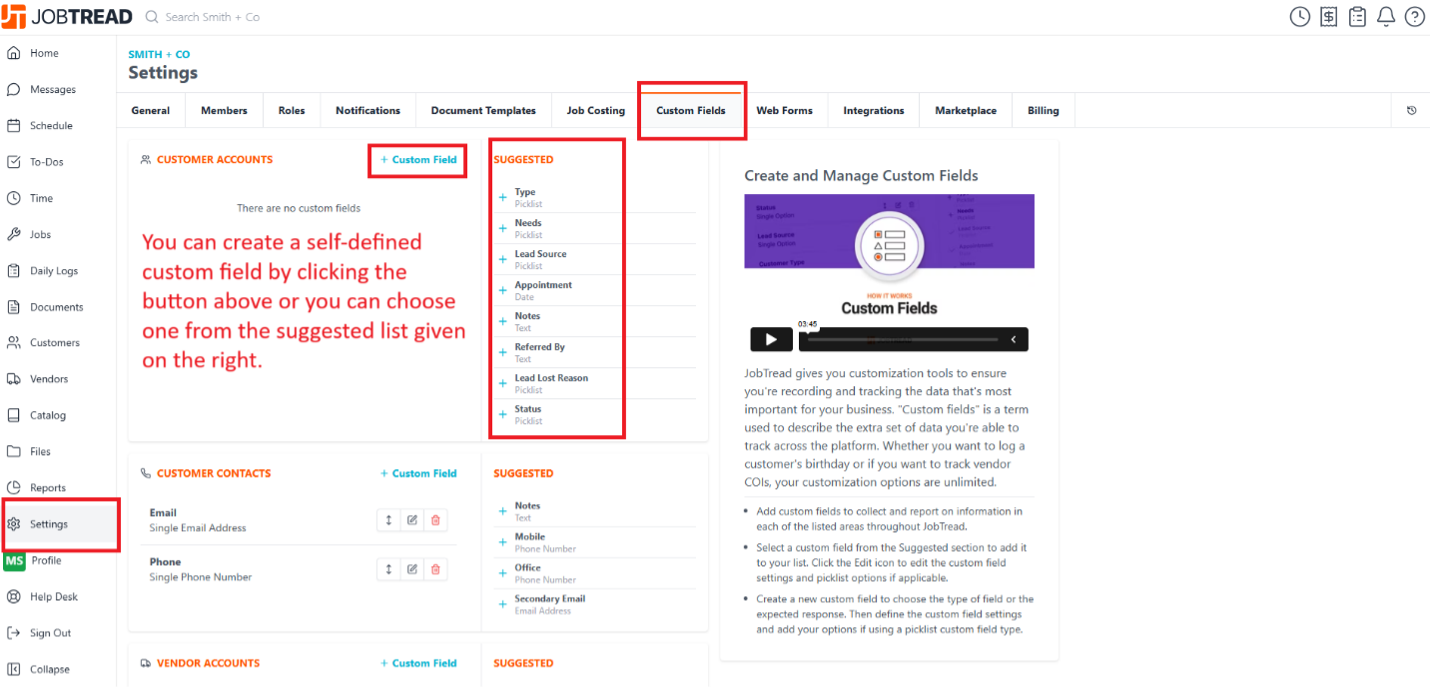
Examples of custom fields include:
- Client status (e.g., new lead, contracted, in progress, completed)
- Preferred contact method
- Payment terms
- Important sales information (e.g. if they've worked with an engineer before)
- Other data you track
If you don’t set up your custom fields now, you will have to manually edit each customer once they’ve been imported and input the data required. It’s a time suck. We’ve found it’s much better to do this in bulk.
To learn more about creating Custom Fields, please view JobTread's training video on custom fields by clicking here.
Once custom fields are added, download the JobTread import template by going to your Customers tab and clicking “Import” in the upper right hand of your screen.
You’ll see the following screen:
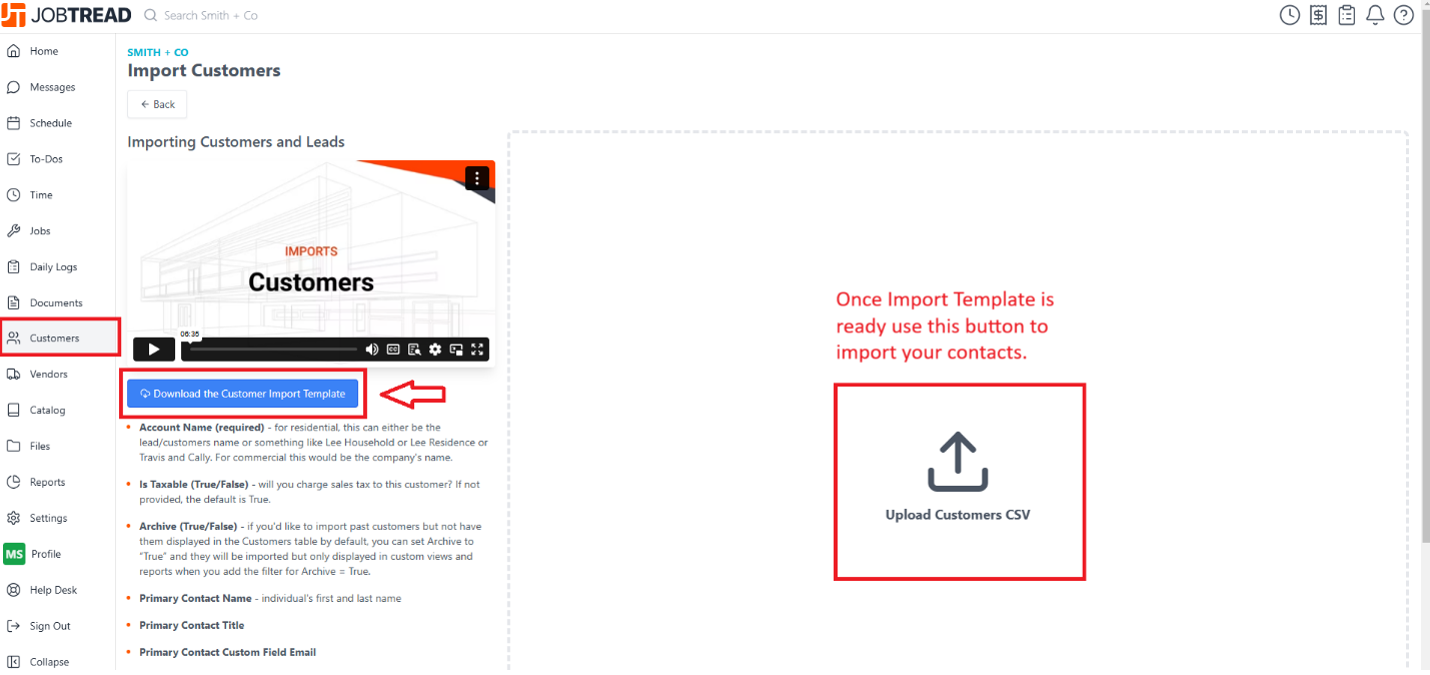
Click the blue button to download the template.
Step 4: Mapping Data to the Import Template
Once you have downloaded the JobTread import template with new custom fields, it is now time to copy your extracted data into the new template.
The fancy term for this is "mapping" data. You're copying data between different spreadsheets and re-organizing it into the correct columns. The import template has a different layout than the QuickBooks export, so you will need to "remap" the data into different columns.
Map the exported QuickBooks data to JobTread's customer import template, ensuring all required fields are populated.
When adding contact information, ensure that the information is accurate and up-to-date, especially if you plan to send invoices or contracts through JobTread. You don’t want to get into the middle of a job and realize you have the wrong email address in the system.
You likely have no information in the exported QuickBooks data for your custom fields that you created in JobTread, so now is the time to add that data. Add the relevant information in each cell for the customer.
Here’s an example of mapping data from the QuickBooks export (on the right) to the JobTread import template (on the left).

Step 5: Update Your Data in JobTread & Validate
Import your spreadsheet into JobTread. On the import screen, you can click “Import All Remaining” in the lower right to import every single customer at once.
Double-check that all data has imported correctly and completely. We typically visit 3-5 customer records to make sure everything looks right.
We typically double-check the account’s location and their contact information. If it isn’t correct, then something probably went wrong when mapping the data or importing the data.
Pro Tip: Contact vs Account Data
You’ll notice when mapping the data between QuickBooks and JobTread that JobTread has “Primary Contact” columns for their email and phone numbers.
This is because each “Account” holds multiple locations and multiple jobs. The hierarchy looks like:
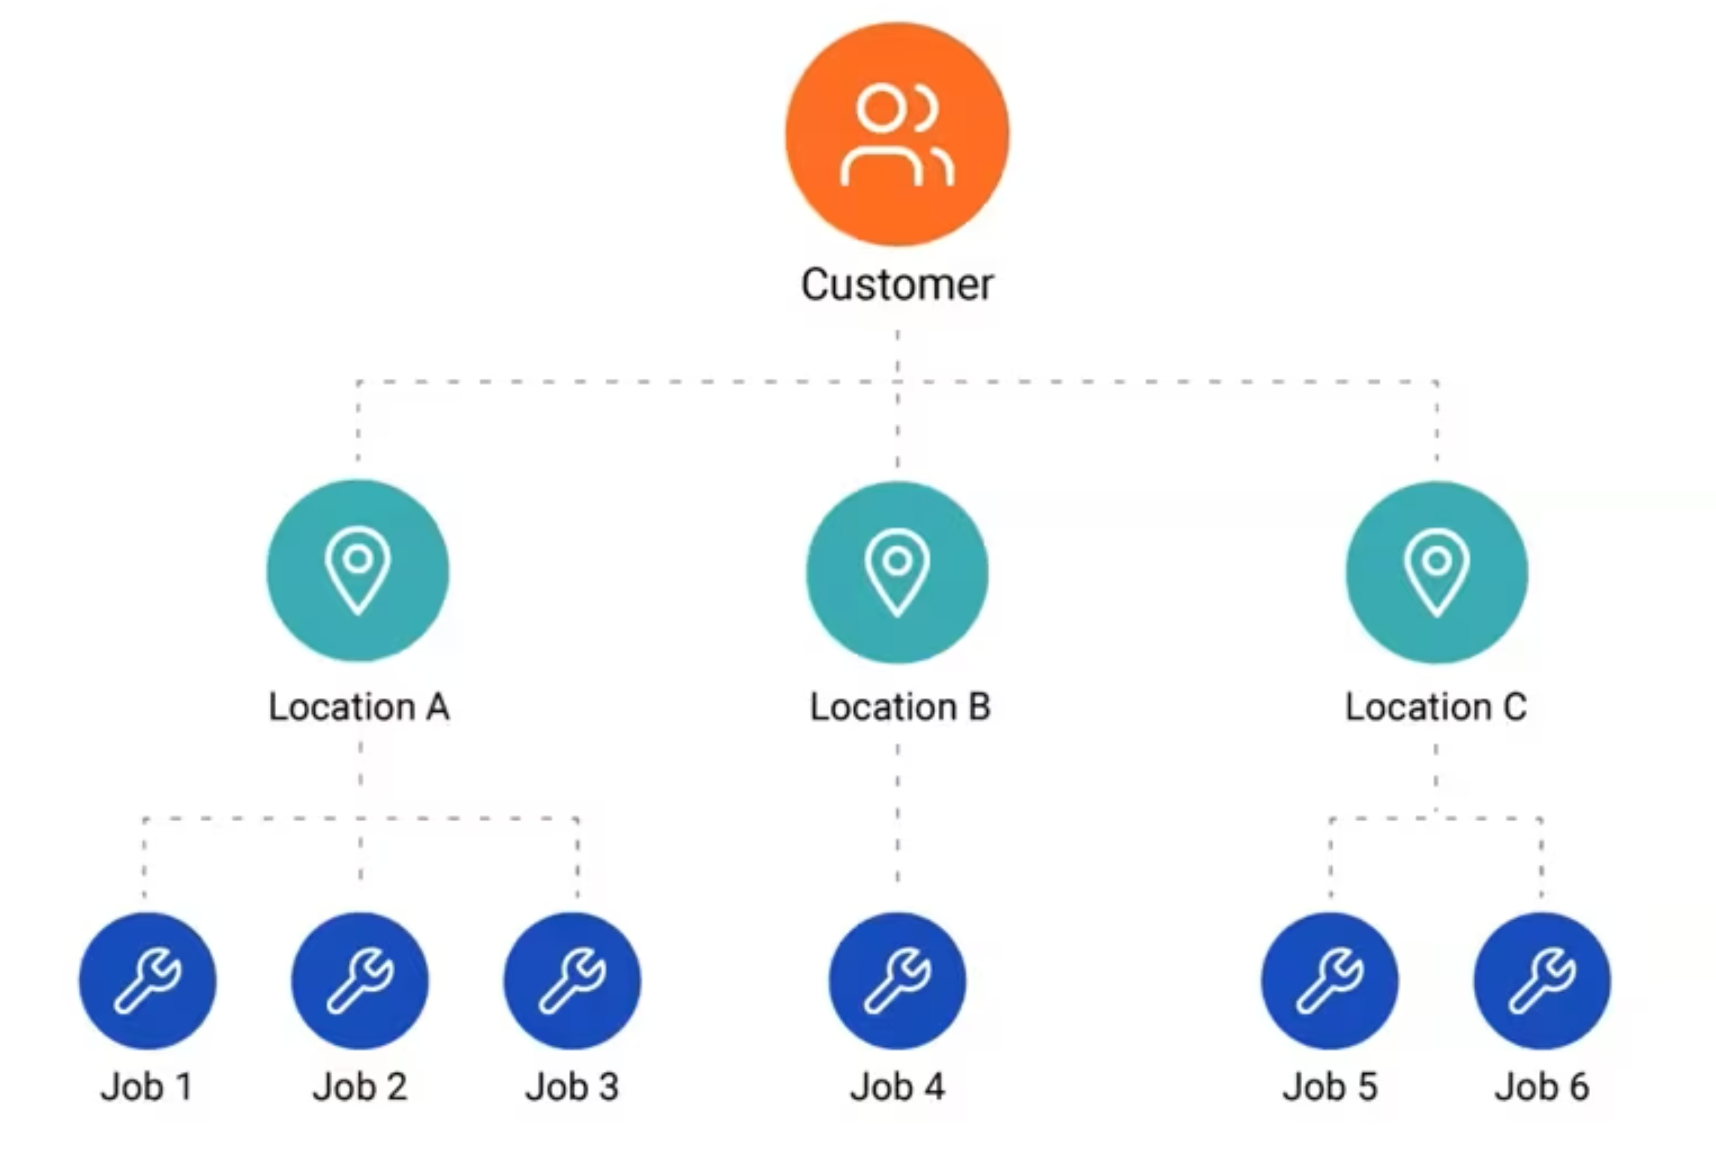
If you work with commercial clients, this is very useful. It allows you to associate multiple contacts with the one account but create jobs across different locations.
But if you’re a residential remodeler, chances are you’ll just need to add one location per account and one primary contact.
Make It a Team Effort
One of the biggest lessons I've learned from working with clients is the importance of collaboration in the setup process. To ensure that JobTread is configured to meet your team's needs, involve key team members from the get-go. Talk with your team to understand:
- What customer data they rely on to do their jobs effectively
- How they currently segment and analyze your customer base
- What reports and views would make their work easier
Incorporate this feedback into your JobTread setup, and don't be afraid to iterate. The goal is to build a system that works for your unique business needs.
Ready, Set, Organize
By following these steps and leveraging JobTread's powerful tools, you can effectively migrate your customers and set the foundation for a more efficient and organized workflow. In the next step, we'll delve into migrating your vendors.
A little upfront organization goes a long way in setting yourself up for long-term success. And if you need any guidance along the way, feel free to reach out. We are here to help contractors make the most of JobTread without having to become a software expert themselves.

