Day 2: Migrate Vendors
In our previous post, we discussed the importance of setting up your customers in JobTread as the critical first step in building a strong foundation. Today, we'll dive into the next essential piece of that foundation: vendor setup.
If you're like most contractors, you rely on a network of suppliers and subcontractors to bring your projects to life. JobTread's vendor management features can help you streamline these relationships, but only if you take the time to set them up properly. Drawing on my experience guiding numerous clients through this process, I'll walk you through the key steps and considerations.
Understanding Vendors in JobTread
Vendors, like customers, can have multiple locations, contacts, and custom fields. However, vendor data is typically more complex and may require additional tracking fields. The primary vendor types you’ll track are:
- Subcontractors: Professionals or companies hired for specific tasks.
- Suppliers: Businesses providing materials and supplies for your projects.
If you’re integrating JobTread with QuickBooks, remember that vendors in JobTread must align exactly with their QuickBooks counterparts to ensure seamless syncing of bills and expenses.
Vendor Setup: Why It Matters
Before we dive into the how, let's talk about the why. Setting up your vendors in JobTread delivers several key benefits:
- Centralized Information: JobTread becomes your single source of truth for vendor contact info, insurance certificates, W-9s, and more. No more digging through files or spreadsheets.
- Streamlined Procurement: With vendor info at your fingertips, it's easy to create and send purchase orders, track deliveries, and manage payments.
- Risk Management: JobTread's vendor tracking features help you stay on top of crucial compliance documents like insurance certificates and W-9s, reducing your risk exposure.
Your Step-by-Step Setup Guide
Ready to get started? Follow these steps to import and organize your vendor data in JobTread:
Step 1: Preparing & Exporting Vendor Data
We are going to export your vendor data from your existing systems. But before exporting vendor data, you need to make sure you:
- Clean up your vendor data: Remove any defunct or one-time vendors, remove duplicates. update any outdated vendor information.
- Evaluate the Necessity of Importing All Vendors: Not all vendors may need to be migrated. For example, casual suppliers you rarely interact with or subcontractors you no longer work with should be removed.
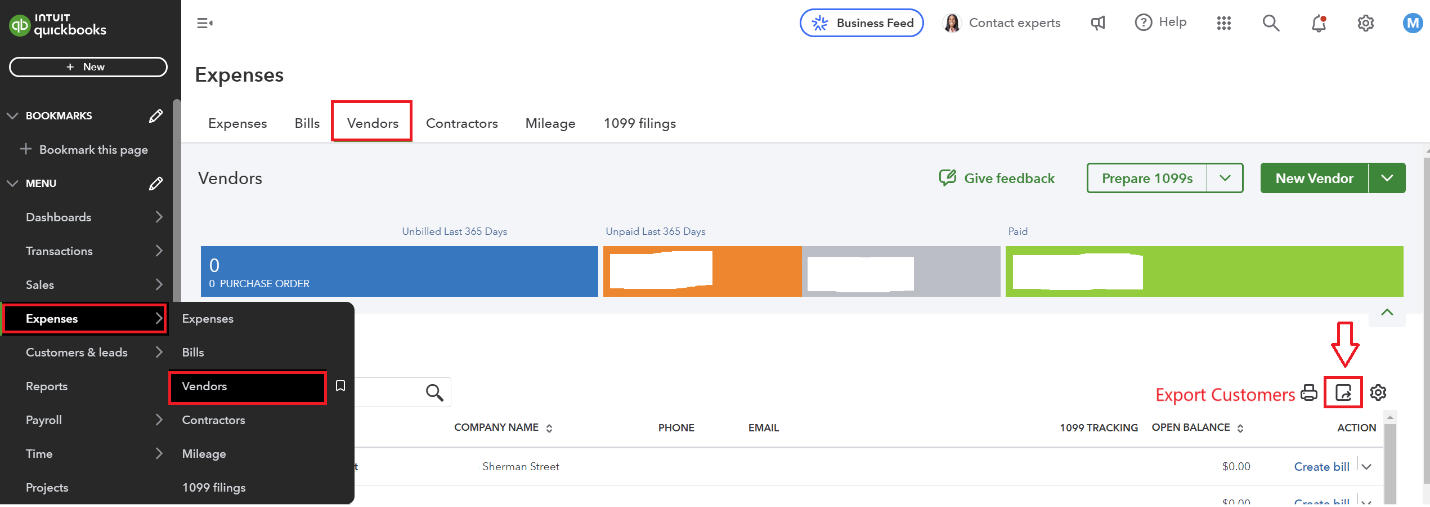
Once your data has been cleaned up, export your vendor list from QuickBooks.
You can find this in QuickBooks by going to your Vendors screen and clicking the Export button.
Step 2: Creating Custom Fields & JobTread’s Import Template
Custom Fields allows you to add custom information + details to any set of data such as vendors. You can leverage this feature to add as much information required by your organization.
We recommend creating custom fields before you import your customers, because you can edit the custom fields in mass inside your Import Template.
Go to your Settings > Custom Fields to add custom fields to your Vendor accounts.

Set Up Custom Fields
JobTread allows you to track critical vendor-specific information through custom fields. By default, JobTread tracks:
- Contact information
- W-9 documentation status
- Certificate of Insurance (COI) status and expiration date
You can add more custom fields, such as:
- Worker’s compensation certificates and their expiration dates.
- Vendor type (supplier or subcontractor)
- LLC registration status with the Secretary of State or other regulatory authorities
- Signed master subcontractor agreements or other key documentation
If you don’t set up your custom fields now, you will have to manually edit each Vendor once they’ve been imported and input the data required. It’s a time suck. We’ve found it’s much better to do this on the front end.
To learn more about creating Custom Fields, please view the following JobTread’s training video by clicking here.
Once custom fields are added, download the JobTread import template by going to your Vendors tab and clicking “Import” in the upper right hand of your screen. Then you’ll see the following screen:
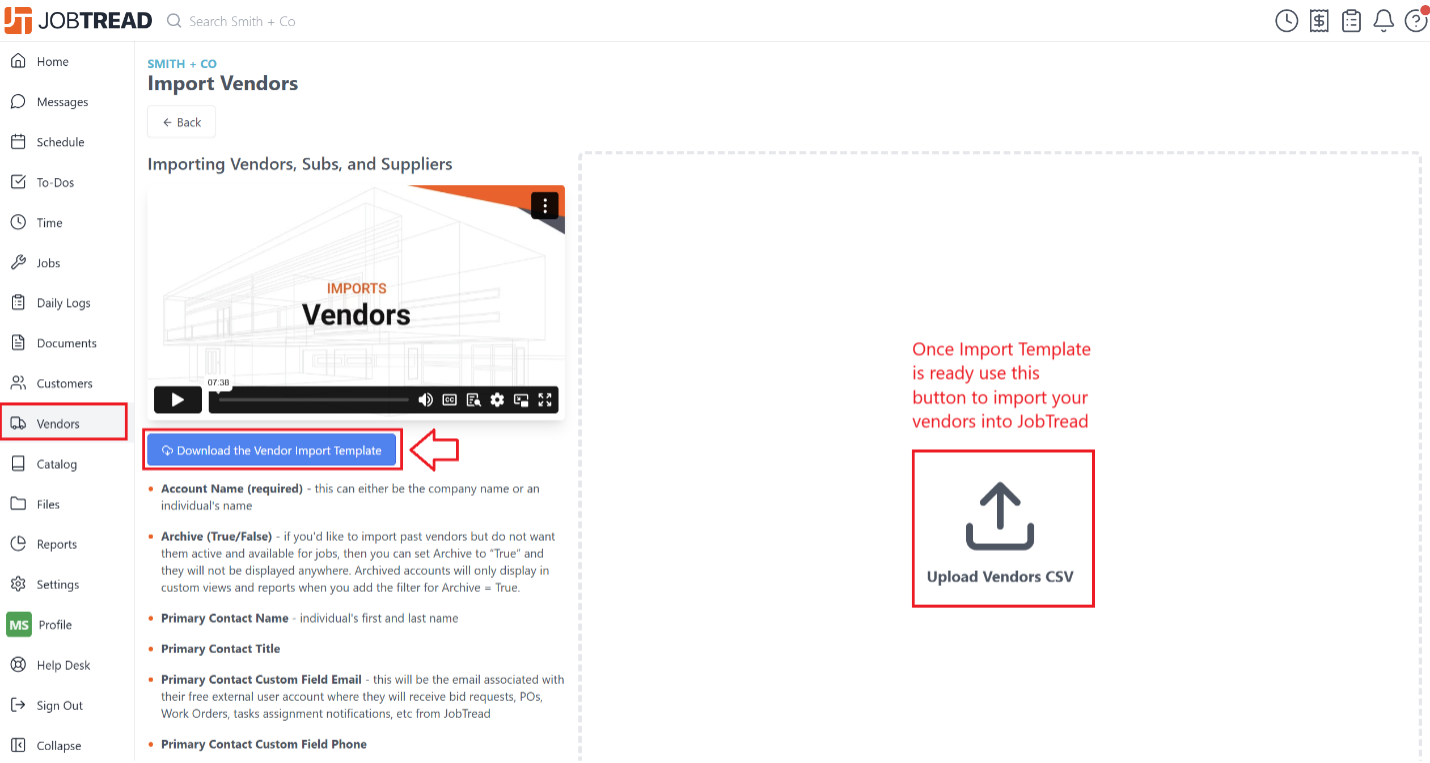
Click the blue button to download the import template.
Step 3: Mapping Vendor Data & Importing Vendors into JobTread
Once you have downloaded the JobTread import template with new custom fields, it is now time to copy your extracted data into the new template.
Reformat Your Vendor Data: Using the JobTread vendor import template, reformat your exported Data into the new template. Ensure that all relevant information, such as names, contact details, and custom field data, is accurate.
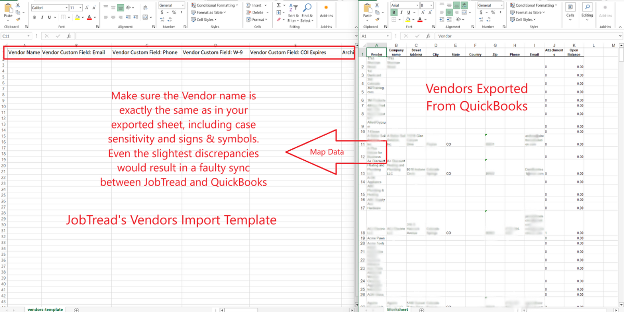
Cross-Verify Vendor Details: Double-check for errors or discrepancies in vendor names. JobTread and QuickBooks must match vendor names exactly to avoid duplicate entries and syncing issues. You don’t want to get into the middle of a job and realize you've been logging bills against a duplicate vendor.
Mapping Custom Fields: You likely have no information in the exported QuickBooks data for your custom fields that you created in JobTread, so now is the time to add that data.
Import Data into JobTread: Upload your formatted vendor data into JobTread. This step establishes your vendor records with accurate details and tracking information.
Here’s an example of mapping data from the QuickBooks export (on the right) to the JobTread import template (on the left).
Step 4: Optimizing Vendor Management Views
After importing your vendors, organizing and customizing how you view this data is critical for using JobTread efficiently.
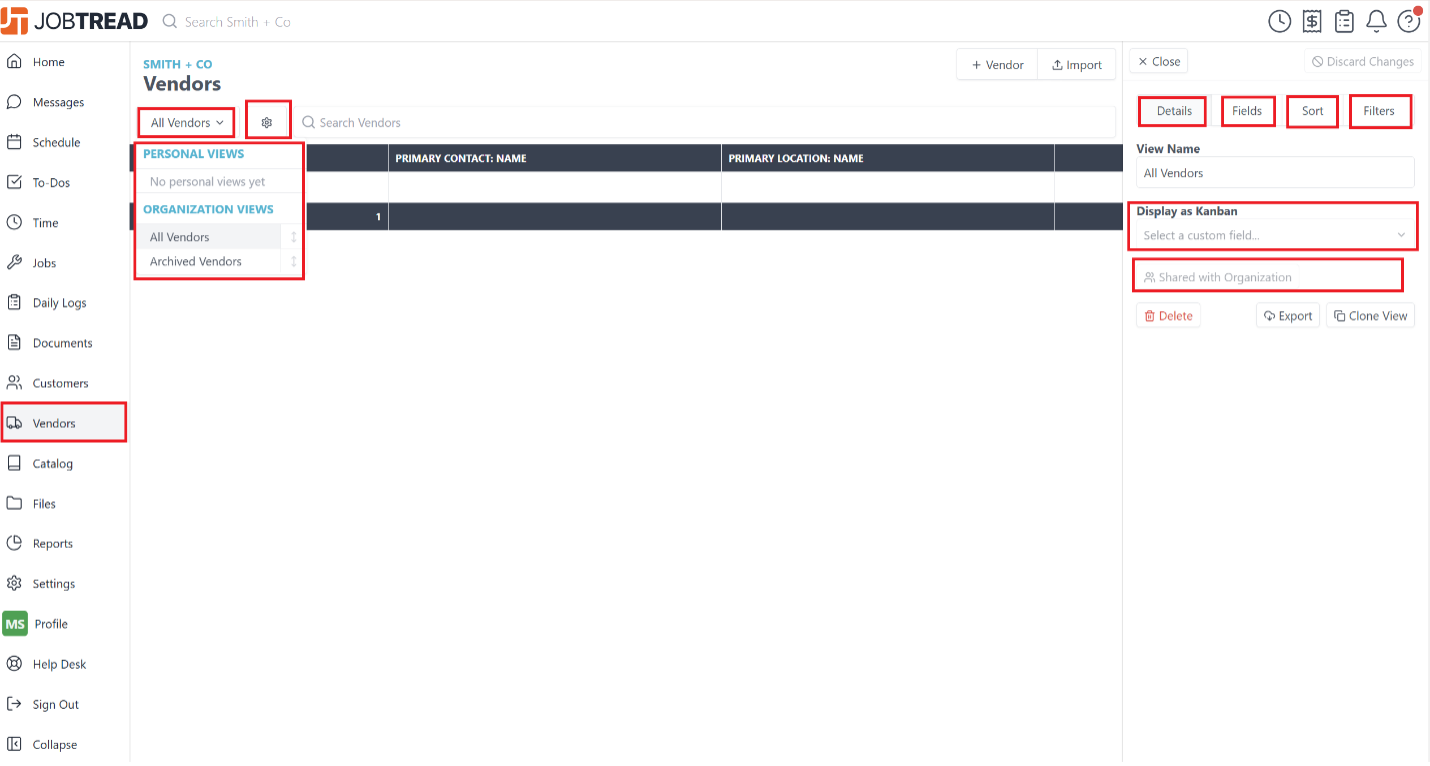
Here are a few options I regularly use when setting up JobTread for a client.
Create Views for Suppliers and Subcontractors
- Before importing, create a Custom Field picklist. Call it "Type" and have two options: Suppliers and Subcontractors.
- After importing the data, go to the gear icon and create a filter based on the custom field for vendor type.
- Save each filter as a separate view using “save as” feature, such as "Suppliers" and "Subcontractors."
- Convert these views to organizational views so all team members can access them.
Customize Visible Fields
- Adjust the fields visible in each view to prioritize essential information and optimize your workflow.
- For example, include vendor names, W-9 and COI statuses, contact details, and COI expiration dates in your primary view.
Create Kanban Views
- Set up a Kanban view to visually track the status of your vendors.
- Use custom fields to categorize vendors based on their status (e.g., pending approval, active, inactive).
To learn more about Custom Views, please view the following JobTread’s training video by clicking here.
In your Vendors tab you can customize and reorganize vendor views according to your needs as shown in the image below:
Step 5: Finalizing Setup for Vendors
Before completing your vendor setup, ensure the following:
- All imported vendors have accurate contact details for sending documents like purchase orders or work orders.
- Organizational views and filters are functional and accessible to your team.
- Fields in views are tailored to display the most relevant information.
Collaboration is Key
As with customer setup, vendor setup should be a collaborative effort. Engage your procurement, accounting, and project management teams to understand:
- What vendor information they need to access regularly
- How they prefer to segment and view vendor data
- What workflows and processes could be streamlined through JobTread
Use these insights to guide your JobTread configuration, and be prepared to make adjustments as you receive feedback during the rollout.
Pro Tip: Leverage JobTread's Features for COI & WC Tracking
Tracking insurance documents is a key part of vendor management. JobTread can notify you when COI or worker’s compensation documents are nearing expiration. You will create a custom notification for this data and notify the right person via email or app notification that their document is coming up for expiration.
If you want to automate this process further, consider integrating a tool like Hound Dog, which streamlines document tracking and notifications.
Vendor Management Made Easy
By carefully planning and executing your vendor migration process, you ensure a smooth transition to JobTread. Setting up custom fields, importing accurate data, and organizing views not only streamlines vendor management but also enhances collaboration and efficiency across your team. And if you encounter any roadblocks or have questions along the way, don't hesitate to ask for help!

