
Day 3: Cost Catalog & Templates

You probably purchased JobTread to enhance accurate cost tracking. It is the core promise of the software! But let's face it: wrangling all your cost data into a usable system can be a headache. Having helped a lot of clients through this process, I'm here to walk you through setting up your cost catalog in JobTread - without the usual frustration.
Understanding Your Cost Catalog: The Heart of Your Financial System
Before we dive into the nuts and bolts, let's clarify what your cost catalog actually is.
For example, painting might include three line items: one for paint materials, another for in-house painting labor, and a third for a subcontractor. Each of these will be separate entries in your cost catalog. It's the DNA of your financial tracking: every cost code, every material, every subcontractor category lives here.
So, it's critical to build this right. But how much detail do you actually need? It depends on your business.
Three Approaches to Structuring Your Catalog
The Exhaustive Approach. For some contractors, hyper-detailed cost tracking is non-negotiable. If you're in this camp, you'll want:
- Individual entries for each material (2x4s, drywall screws, paint)
- Separate line items for the labor and materials on each task
- Distinct categories for each subcontractor type
This approach gives you ultimate granularity in your cost data. But it comes with a lot of upfront setup and ongoing maintenance. I'd recommend doing this if you have complex reporting needs, strict compliance requirements, or are migrating from an existing suite of software like CoConstruct/BuilderTrend where you've already built this out before.
The Simplicity Approach. On the flipside, many contractors prefer a more streamlined setup. Think:
- Broad category buckets instead of individual materials
- Combined labor and material line items
- Subcontractor work grouped by trade
If you're a specialty contractor or home builder producing spec homes, this approach keeps things clean and easy to manage. You trade some detail for efficiency.
The Goldilocks Approach. For most contractors, the right answer lies somewhere in between. You'll want:
- More detail in areas that need tighter management
- Simplicity in areas that don't drive your bottom line
- A balance between insightful data and ease of use
Consider a remodeler that does a lot of custom kitchen projects. You might have detailed line items for cabinets and countertops, but one big category for all the tile work that gets subcontracted out. The key is striking a balance.
How JobTread's Cost Catalog Works

The Cost Catalog is pretty straightforward.
- Cost items are "line items" in your budget. They are the standalone entries that you will log bills for and track time against.
- Cost codes are accounting codes. Cost codes are used primarily to sync with QuickBooks.
- Cost types help group similar cost items together. This is a versatile setting. For example, you can restrict time tracking entries to only certain cost types. Or, you can sync the same cost code with different products in QuickBooks using cost types.
- Cost groups are templates. They create templated groups of cost items you can use and re-use in different jobs.
Critical Decisions to Make Pre-Setup
With your overall approach in mind, you've got some upfront choices to make that will streamline your catalog setup:
Default Costs. For materials or labor activities with predictable costs, set a default unit cost. This will auto-populate on estimate templates, saving you time. Leave it blank for anything with highly variable costs. And don't worry - you can always adjust these defaults later in bulk.
Taxability. Avoid a massive headache later by determining which items are taxable upfront, according to your local regulations. If you pay an excise tax on everything for your job, you'll want to make sure everything is "taxable." Configure these settings before importing your catalog. Trust me, you don't want to edit this line by line later.
Cost Types. JobTread uses cost types to categorize expenses. Standard options include Labor, Material, Subcontractor, and Equipment - but you can add others as needed. Think through which you'll use in advance.
Cost Codes. Want to get really granular? Set up detailed cost codes for each major work area, like 01-00 for Administrative, 01-10 for Consulting Fees, and so on. This will come in handy when you integrate with QuickBooks later. But if you're keeping it simple, JobTread's default codes will work just fine.
Cleaning Up Duplicates. Before migrating, clean up duplicates in your current system to streamline the process and avoid redundant entries in JobTread.
Step-by-Step: Importing an Existing Catalog
Already have a cost catalog in another system? Lucky you! Here's how to move it over:
- Export your current catalog to a spreadsheet
- Download JobTread's catalog import template
- Map your data to JobTread's format, matching fields carefully
- Clean up any duplicate or outdated entries
- Import the file into JobTread, double-checking for errors
Voila! Your cost DNA is now in JobTread.
You can find the import template by going to Catalog > Import, then clicking the Download button as pictured:
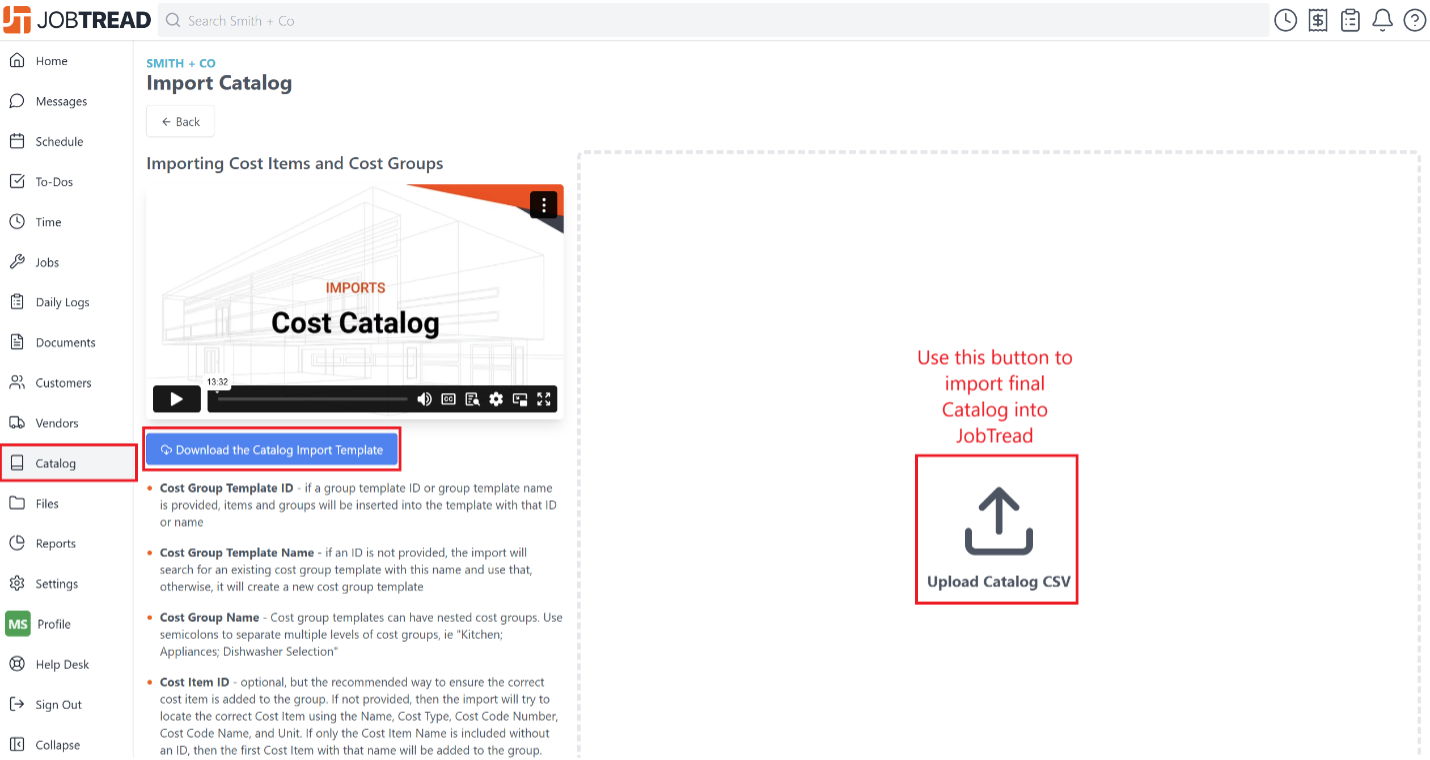
Your existing catalog may vary in formatting. CoConstruct and BuilderTrend, for example, export their catalog differently and it may involve manually copying & pasting data from one system to the other.
You can also use QuickBooks to grab your existing cost codes (not cost items) by going to the Sales tab on right and pressing on the Product & services tab in the navigation menu. This will massively simplify the integration completed in Step 4.

If you have questions about how best to use the QuickBooks export while importing your Cost Catalog, ask us! We'd be happy to help.
Starting From Scratch: Building a Simple Catalog
You may not have an existing catalog. In that case, identify the items you typically bill for or track time against, such as site work, rough plumbing, HVAC installations, etc. Assign default cost types and codes using JobTread’s preloaded settings, which can be modified later for greater detail as your familiarity with the system grows.
If you're starting fresh, resist the urge to get fancy. Begin with the basics:
- List out your most common billable items and expense categories
- Set up each one in JobTread with a name, description, and default cost type
- Assign a cost code
- Leave the door open to add more detail as you go
Remember, you can always layer on complexity later. The important thing is to get a functional, usable catalog in place so you can start tracking real jobs.
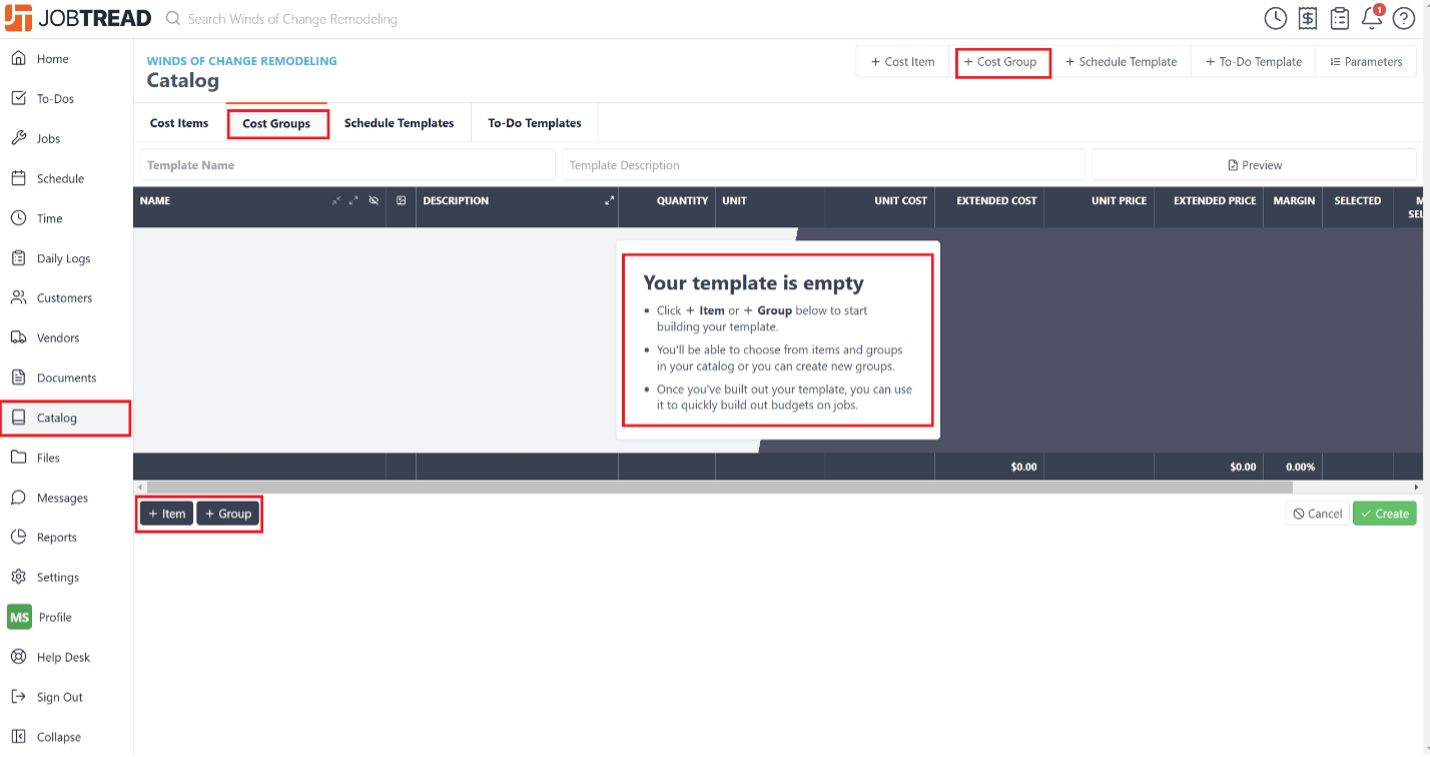
Use the following navigation to access cost catalogs and to add new cost items. We'll talk about creating Cost Groups (highlighted) in a second.
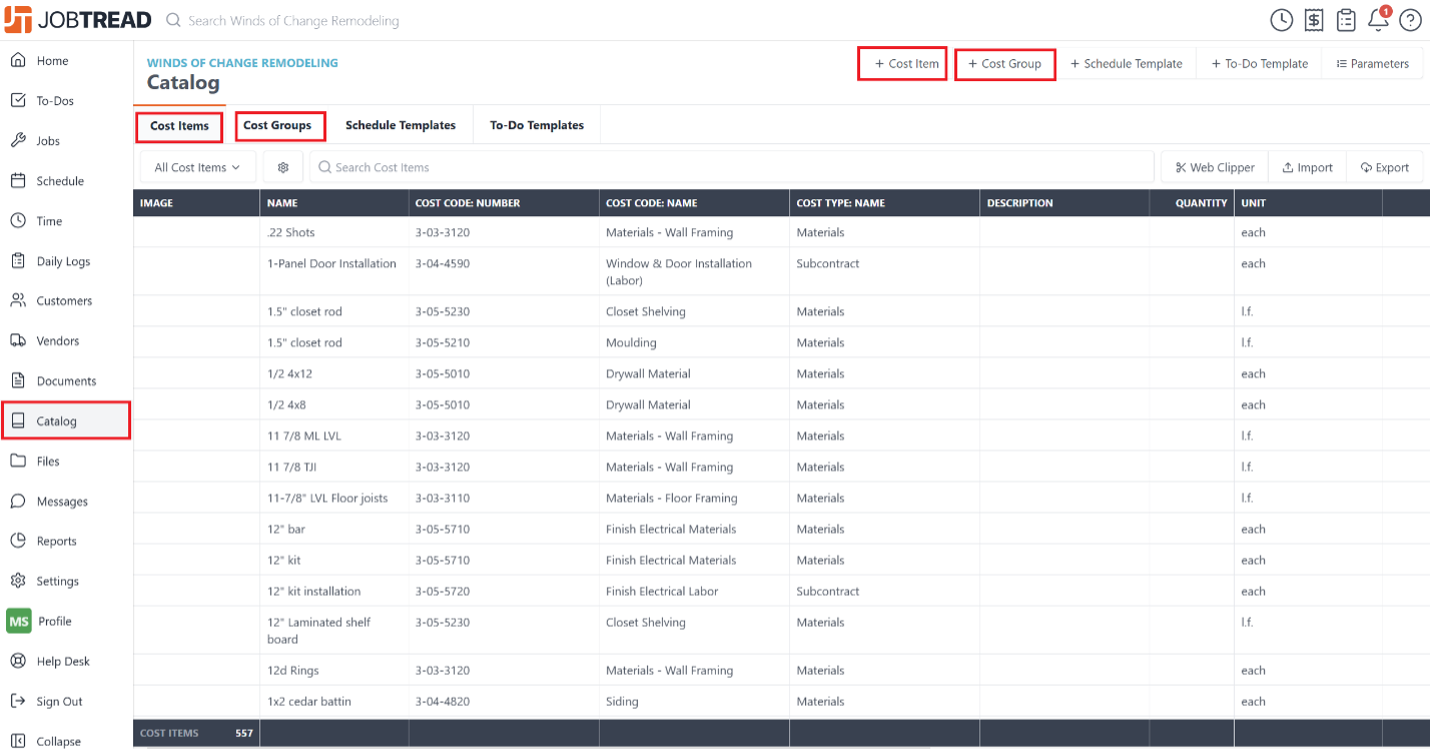
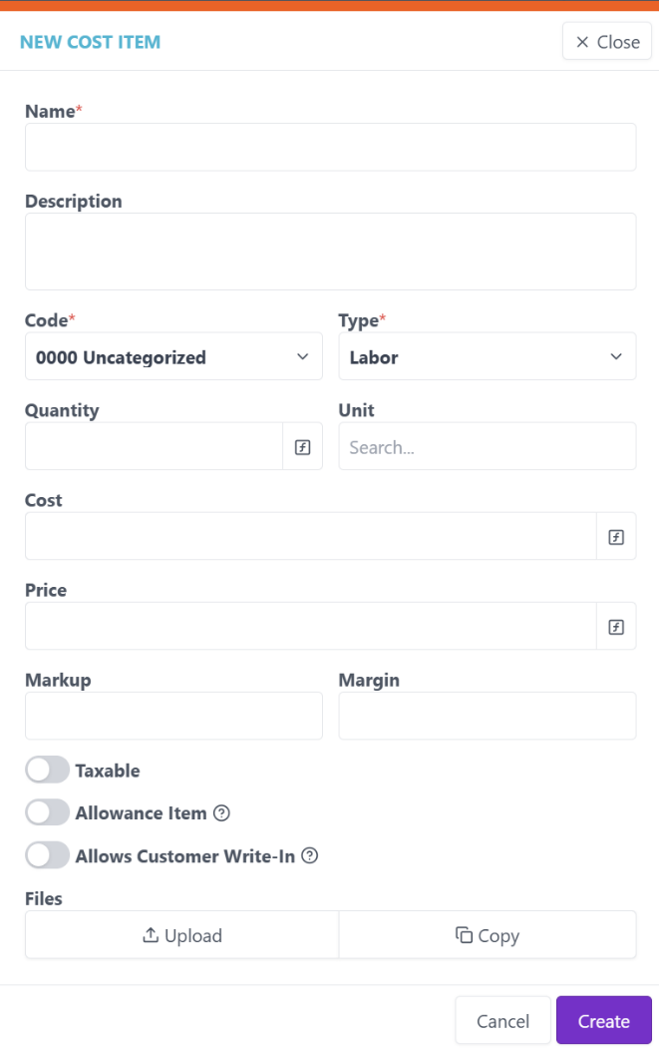
When adding a new cost item, either use the standard fields given by JobTread, or create new custom fields, to track as much information required by your organization per item.
Turning Your Catalog into Useful Templates
You've built your cost catalog - congrats! But what good is a master list without practical application? Enter Job Costing Templates.
In JobTread, these are called Cost Groups - pre-built assemblies of common cost items that you can bring into individual jobs. For example, a kitchen remodeler might create separate templates for full remodels, cabinet installations, and countertop replacements. A home builder might have comprehensive templates for entire builds. Here's how to set them up:
- Go to your Catalog tab.
- Click the Cost Groups tab and hit "+ Cost Group"
- Name the template (i.e. "Kitchen Remodel")
- Use the "+" button to add relevant items from your catalog
- Organize items into logical Groups, like "Demo" or "Electrical." (The +Group item at the bottom of the screen allows you to create visual groups of cost items – it's not creating a whole new template)
- Save your masterpiece for reuse, you can modify templates at any time by adding or removing items or groups.
The key here is to strike a balance between detail and usability. If a template is too granular, your team will struggle to use it consistently. Too broad and you sacrifice valuable insights. Find a balance that works for you.
Putting It All Together: Setting Up Your First Job
You've imported your catalog, built your templates - now it's time to put JobTread to work on a real project. Here's how:
- Create a new job and select the customer from your newly imported list of Customers
- Customize job details, such as type or remodel category. You can modify default fields by going to Settings > Custom Fields and editing the “Jobs” section
- Navigate to the Budget tab and Add a Cost Group by clicking the "+Group" button in the lower left. This will populate the budget with your predefined line items and groups.
- Customize the template as needed for the specific project
- Fill in any additional job information
- Save and admire your handiwork
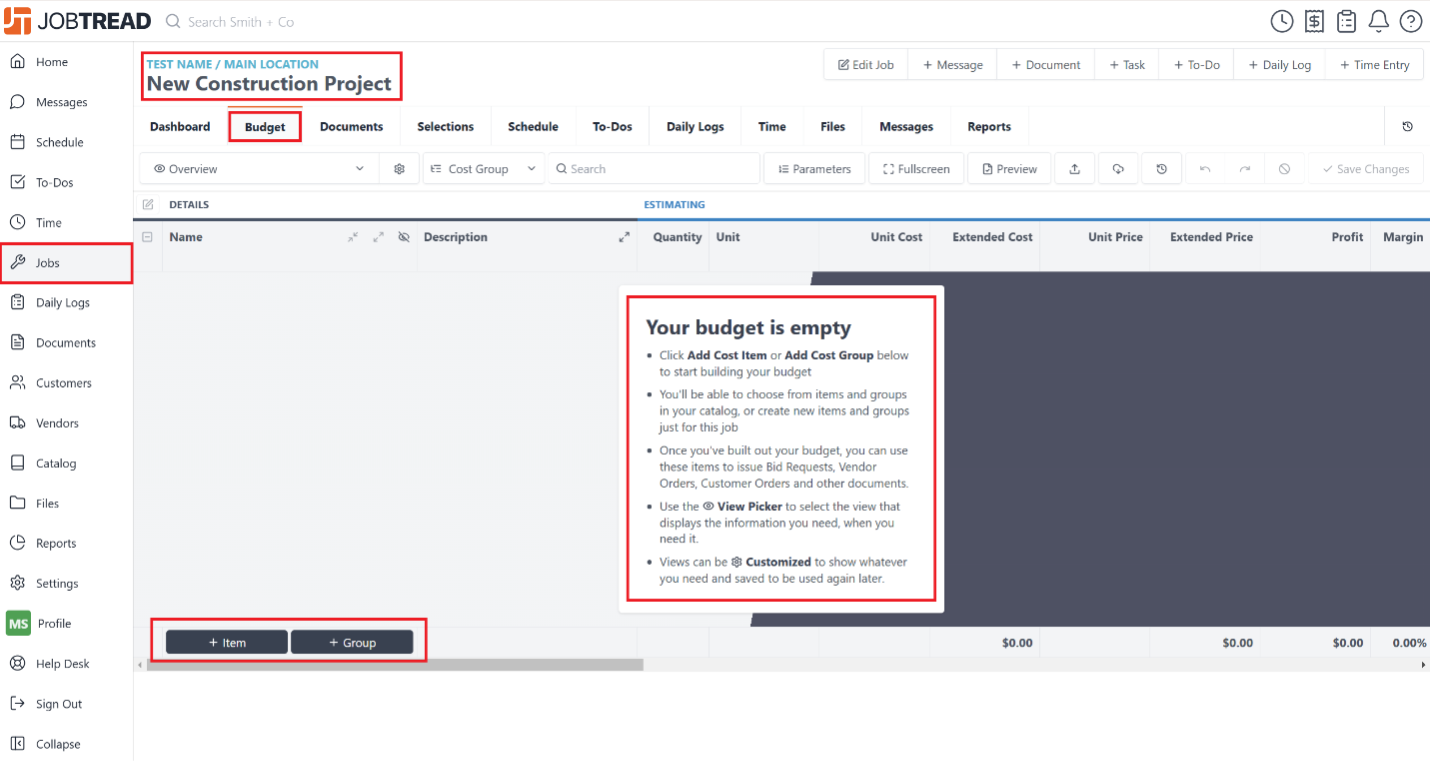
And there you have it - you're officially tracking a job in JobTread!
Pro Tips:
- Keep your catalog clean. Avoid duplicate items, use clear naming conventions, and always keep your QuickBooks integration in mind. A little upfront organizing will save you hours later.
- Start simple and iterate. Rome wasn't built in a day and neither is the perfect cost tracking system. Start with the essentials, then layer on more sophistication as you go. Trying to track everything out of the gate is a recipe for frustration.
- Make it work for your team. The best system is the one your team will actually use. Make sure your catalog and templates match how your team actually works. Involve them in the process and get their feedback often.
By building a well-structured cost catalog and intuitive job costing templates, you lay the groundwork for accurate job tracking and seamless financial integration. While the initial setup requires effort, the payoff in operational efficiency and financial clarity is invaluable.
In the next step we will discuss syncing JobTread with QuickBooks. For now, focus on getting your catalog and templates dialed in. And as always, if you need a hand, just holler. We're here to help you make the most of this powerful tool - so you can spend less time wrangling data and more time growing your business.
Continue the Series:
- Getting Started
- Migrate customers into JobTread
- Migrate vendors into JobTread
- Set-up your Cost Catalog, Default Budget Templates, and Dummy Job (this post)
- Integrate with QuickBooks
- Create Document Templates and Standard Workflows
- Create Roles & Invite Users
- Test and Troubleshoot the System