
Day 4: Integrate with QuickBooks

This is the part of the set-up that typically causes the most heartburn. Accurate job costing, invoicing, and expense tracking are the pillars of running a profitable business – but it has to happen by integrating JobTread and QuickBooks together.
One misstep and you’re left with a tangled mess of data that takes hours to unravel. Trust me, I've seen all kinds of errors.
That’s why I’ve put together this guide – to walk you through the integration process step by step, highlighting common pitfalls and sharing tips I’ve learned from a lot of client engagements fixing flawed QuickBooks integrations.
Understanding the Integration: What Does It Actually Do?
Before diving into setup, let’s clarify what this integration accomplishes. In a nutshell, it connects:
- Bills and Expenses: Links bills to QuickBooks expense accounts.
- Time Tracking: Syncs employee time entries to QuickBooks for payroll (if you’re using that feature).
- Invoices and Payments: Connects your JobTread invoices to QuickBooks income accounts.
- Void Markings: Keeps invoice voids in sync between the two systems.
When set up correctly, this integration ensures that your financial data flows seamlessly between JobTread and QuickBooks, saving you time and ensuring accuracy.
Step 1: Initial Setup & Default Configurations
To kick things off, head to Settings > Integrations > QuickBooks (accessible via the gear icon in the top-right corner of the JobTread dashboard) and sign in to your QuickBooks account. Ensure that you are using the same QuickBooks Online account that your organization has been actively using for managing finances.
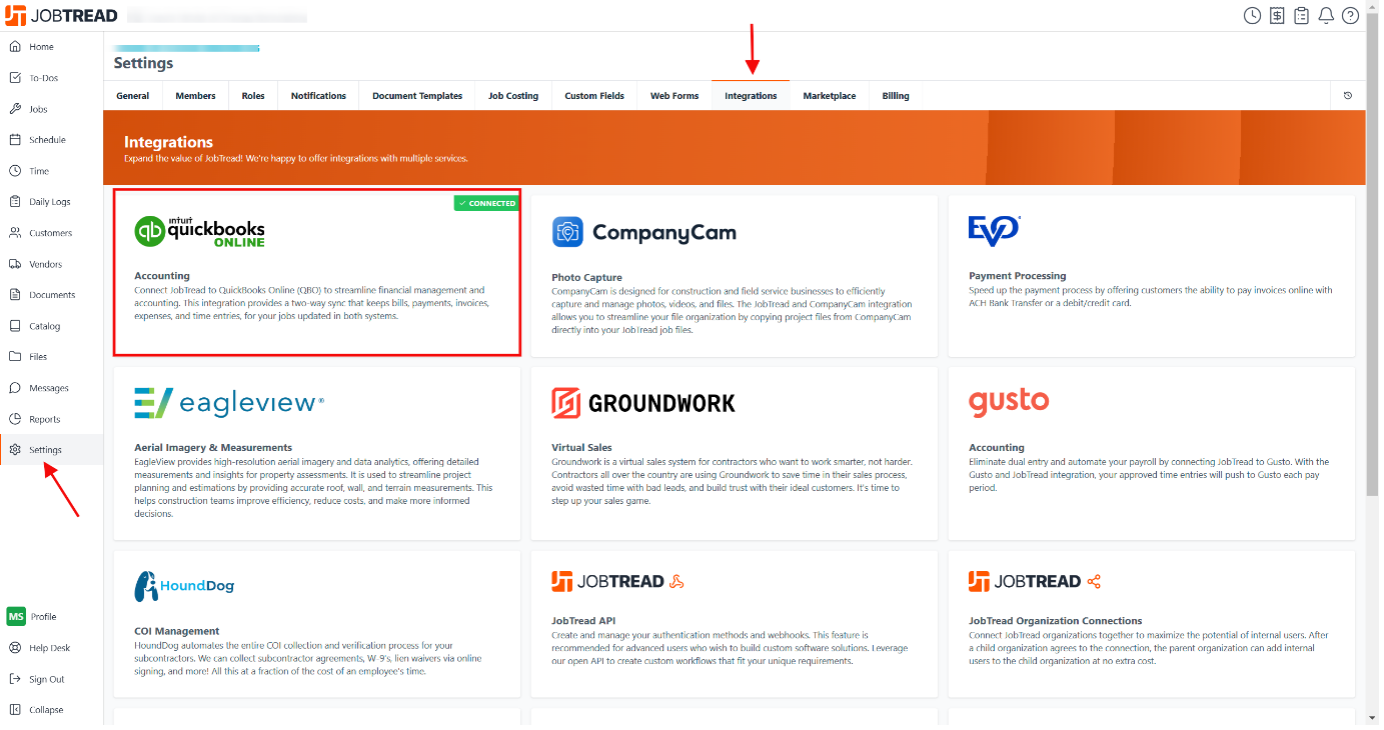
Once logged in, review the default integration settings carefully. These include:
Customer Sync Options
Choose Sync by Customer with Job as Sub-Customer unless you:
- Primarily work with commercial clients that have multiple locations.
- Frequently handle customers with numerous properties.
- Have an extremely high volume of jobs across different addresses.
Why? The default three-way sync (Customer + Location + Job) often creates unnecessary complexity in QuickBooks. Keeping it to Customer + Job is simpler for most residential contractors.
Expense Account Defaults
Ensure all uncategorized expenses have a fallback account in QuickBooks, such as a general "Miscellaneous Expenses" or "Uncategorized Costs" account. This reduces errors during syncing. You can learn more about this by reviewing our QBO troubleshooting article.
Tax Preferences
If your business handles taxes within QuickBooks, confirm that your tax codes align with JobTread’s configurations. Any mismatch can lead to discrepancies in billing or expense reporting.
Decide on QuickBooks Projects
If you’re using projects in QuickBooks, enable the Use Projects option. However, this adds complexity by requiring you to manually set-up each project in QuickBooks, each job in JobTread, and sync them together manually. If possible, we'd recommend moving off QBO Projects in favor of the default settings for syncing by customers. JobTread's WIP reports are a pretty robust replacement for what you get out of QuickBooks Projects. However! It's up to you to determine what you would prefer.
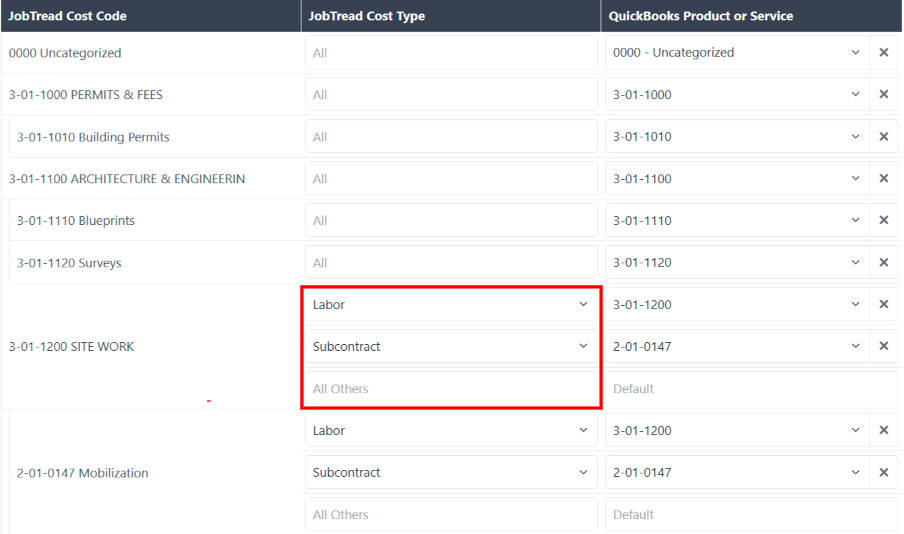
Step 2: The Make or Break Step – Product & Services Mapping
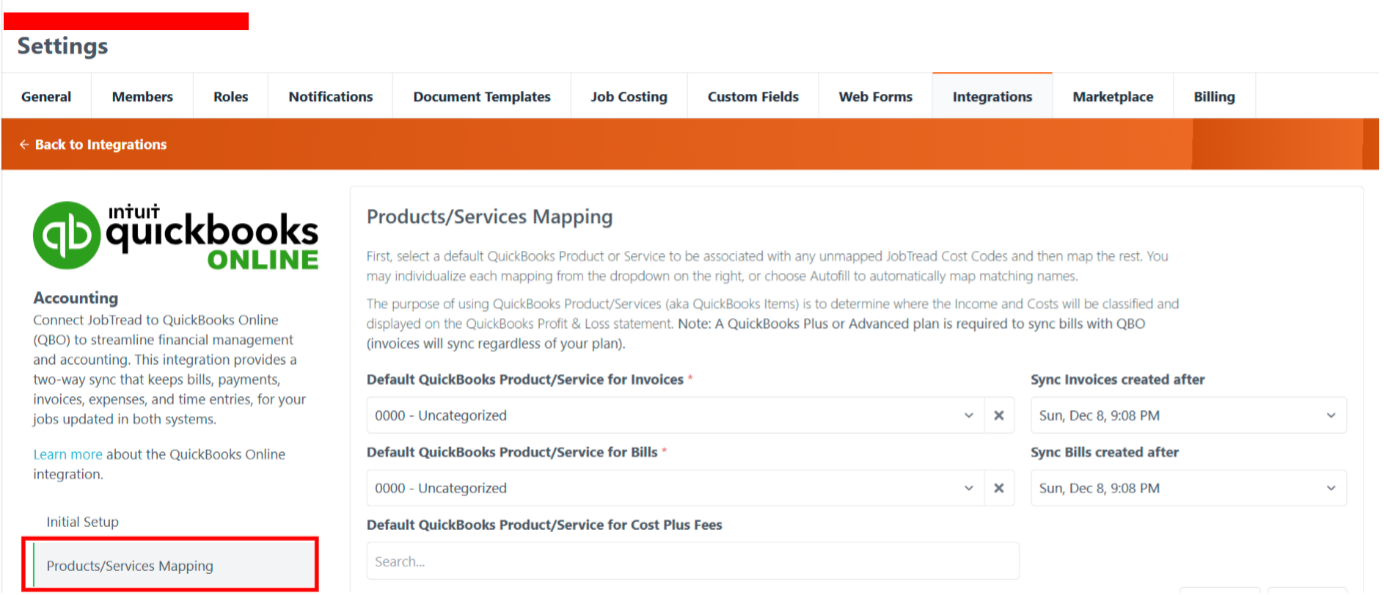
This is where the rubber meets the road. In this step, you’ll create a bridge between JobTread’s cost codes and QuickBooks’ products and services. Getting this right is critical.
Create QuickBooks Products & Services
Let's review how the sync works with QuickBooks. Take a look at this diagram:
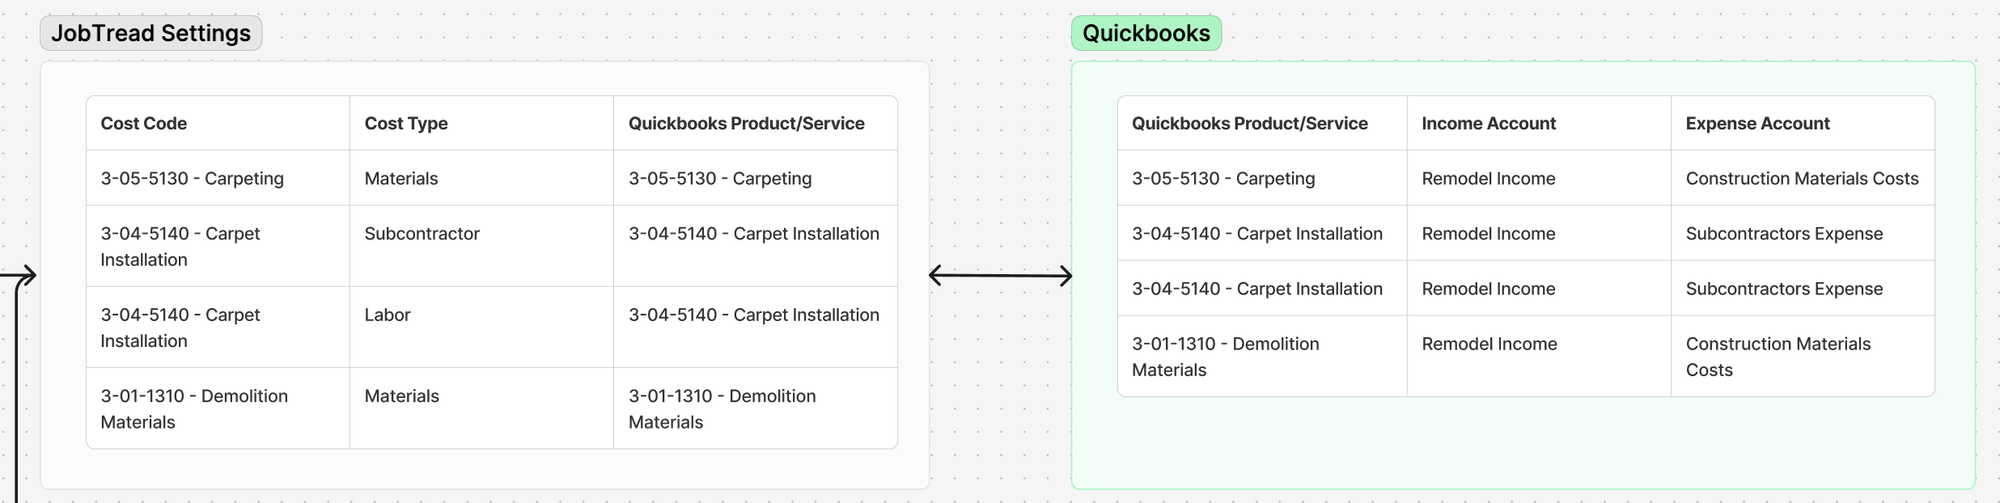
This is from a larger diagram we have for our clients at Smith + Co. The way the sync works is, every time a bill or invoice is generated, it checks for a cost code and the selected QuickBooks Product/Service chosen in the mapping menu.
Each QuickBooks Product/Service has an income account and an expense account when you set it up. If the JobTread document is an invoice, then the income will be registered against the income account chosen. If the JobTread document is a bill, then the expense will be registered against the expense account chosen.
If you don't already have QuickBooks Product/Services set-up, you will need to create them for the cost codes in JobTread.
Income Accounts
When you create a Product/Service in QuickBooks, you’ll choose an income account where customer payments will land. My advice? Keep it simple:
- Stick to one or two broad income accounts (e.g., "Remodeling Income").
- Avoid creating separate accounts for every service type.
- Use the same income account across services unless you have a compelling reason to split them out.
Expense Accounts
This is where you’ll map your cost of goods sold. Each cost code should flow to the relevant expense account on your profit & loss statement. These expense accounts are typically:
- Materials Purchases
- Subcontractor Costs
- Equipment Rentals
- General Cost of Goods Sold
Depending on how you set-up your catalog, you might map multiple cost codes to the same Product/Service. But, you can also create a Product/Service for each cost code in JobTread. This is what we typically do when a client wants more granular tracking or a more granular set-up.
Handling Complex Cost Codes
Let’s say you have a "Concrete" cost code for Cost Items that includes both material purchases and subcontractor costs. How do you split that out?
The answer: Cost Types. In JobTread, you can assign different cost types (Materials, Labor, Subcontractor, etc.) to the same cost code. Then, in your QuickBooks mapping, you can link each cost type to a different Product/Service:
- Concrete (Materials) → QBO Product with Materials Expense Account
- Concrete (Subcontractor) → QBO Product with Subcontractor Expense Account
This way, your costs flow to the right place in QuickBooks based on their type, not just their high-level cost code.
Set Up a Catch-All Account
Even with careful mapping, mistakes happen. That’s why setting up an effective error-catcher system in QuickBooks is essential. Create an "Uncategorized" or "0000 Uncategorized" Product/Service in QuickBooks to act as a safety net for unmapped items, including:
- Missing cost codes in JobTread.
- Incorrect cost type assignments.
- New or unconfigured budget items.
Review this account regularly to spot and correct mapping issues before they snowball into a big mess.

Step 3: Employee Mapping (For QuickBooks Payroll Users)
If you use QuickBooks for payroll, there’s one more critical step: mapping your JobTread users to QuickBooks employees. This ensures that time entries logged in JobTread flow correctly to QuickBooks for payroll processing.
How to Map Employees
- Navigate to Settings > Integrations > Employee Mapping in JobTread.
- Link each JobTread user to their corresponding QuickBooks employee.
- Set a start date for syncing approved time entries.

Step 4: Syncing Past Records (Optional)
If you're migrating into JobTread, chances are you have in-progress jobs that need to have their bills and invoices synced with JobTread.
Whenever you set-up a job, you can map the job to an existing QBO Customer or Project. At the bottom of the window when you create a new job, you'll find a menu called "Integration Settings."

Here, type in the name of the customer or project that has the associated invoices and bills. Moving forward, JobTread will sync all records to this customer for this job.
You need to make sure you have "Pull Expenses" enabled in your basic settings for your historic bills to be pulled in for the job.
Step 5: Payment Accounts and Processing
You will need to set default accounts for deposits and withdrawals for payments marked in JobTread.
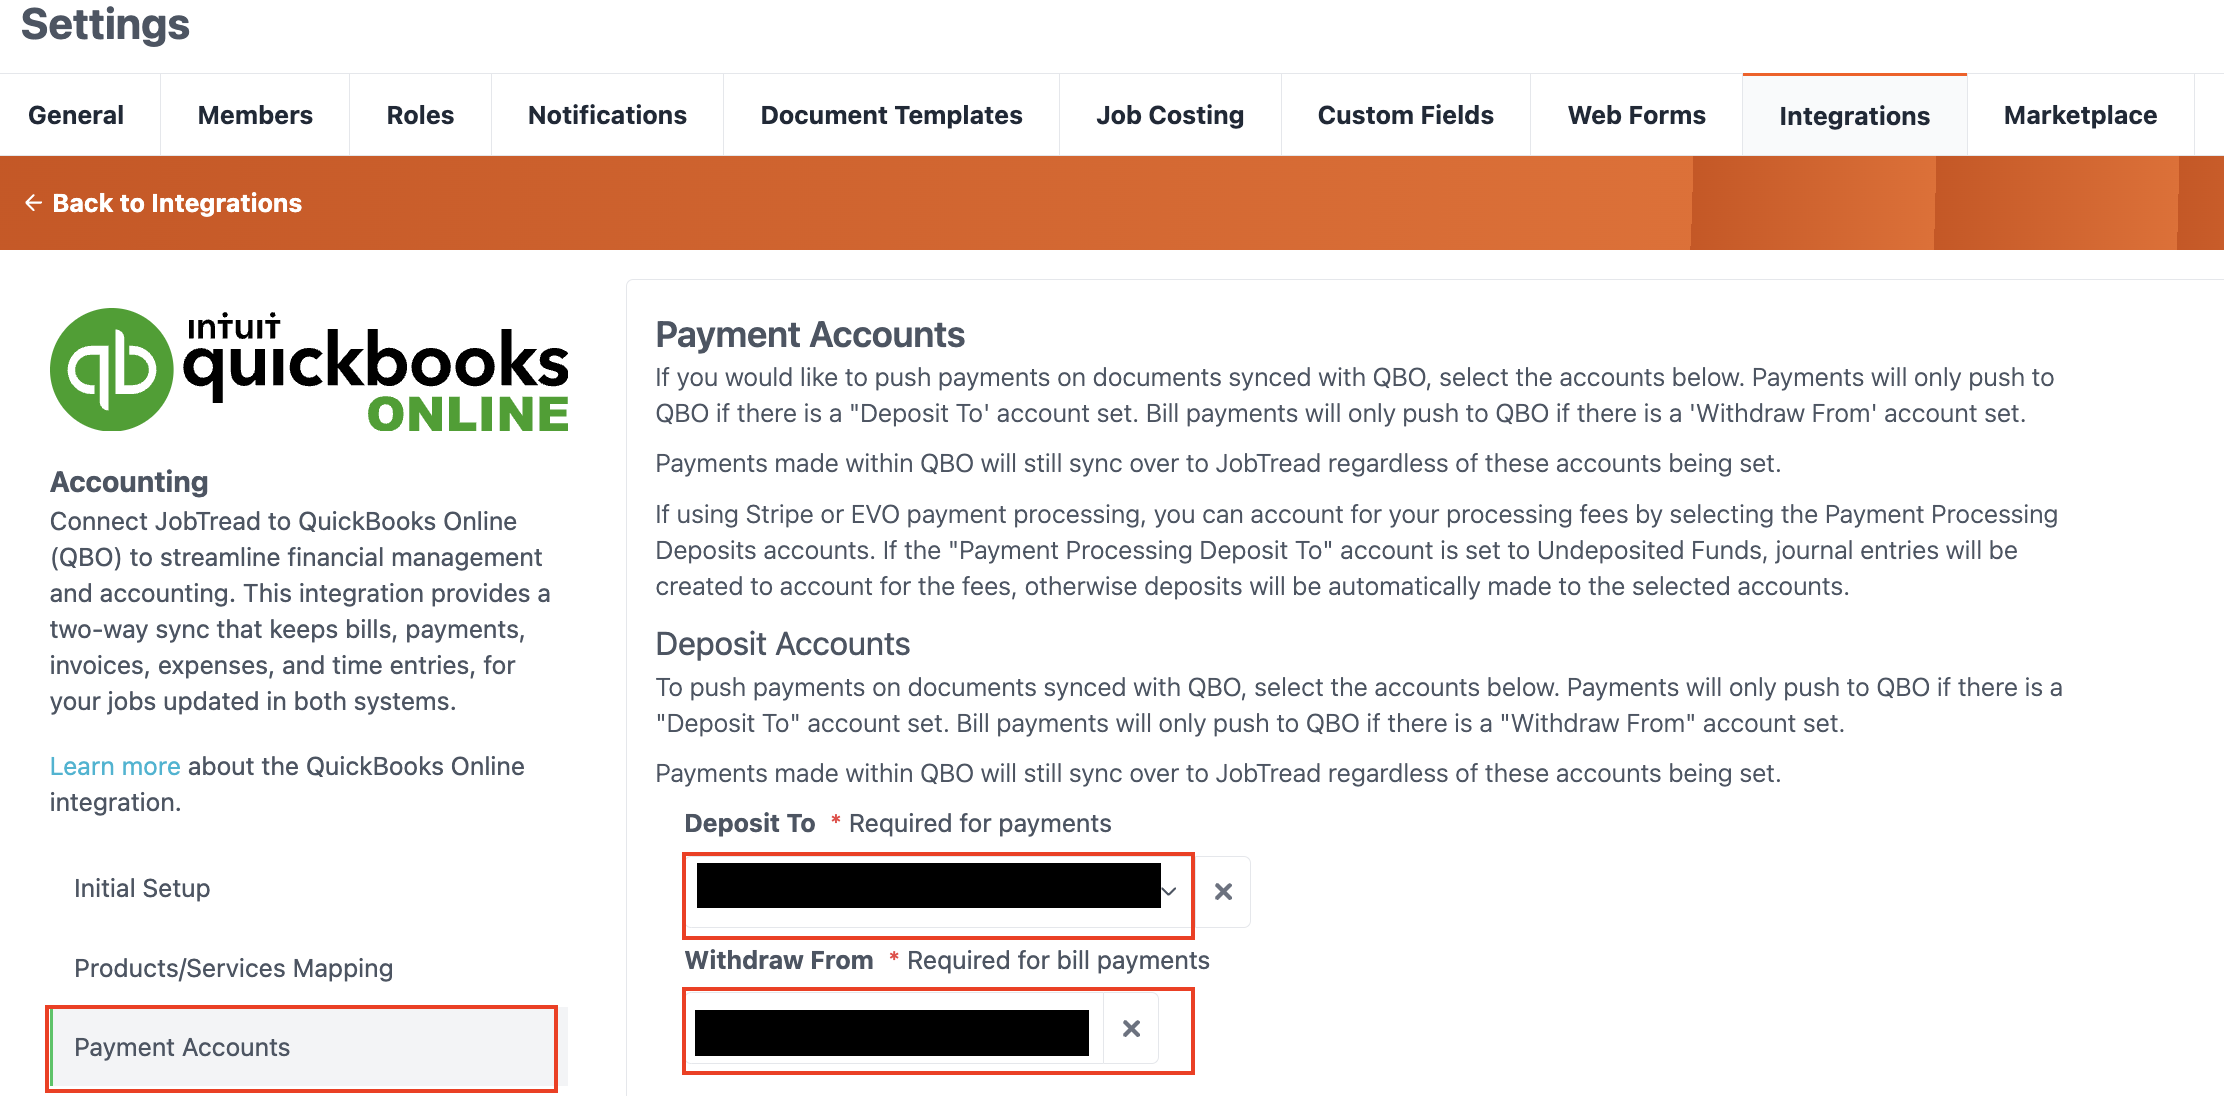
The "Deposit to" account is the default account that payments will be deposited to. This is likely your main checking account where you would deposit checks or online payments.
The "Withdraw from" account is the default account that you will pay vendors out of. This is also likely your main checking account, but it might be a different account.
Payments marked in JobTread will automatically sync to the designated accounts in QuickBooks. Any adjustments or additional fees processed in QuickBooks will reflect back in JobTread.
Practical Tips
- Regularly review the payment account mappings in JobTread to ensure no misalignment with QuickBooks accounts.
- Test a small payment batch to confirm proper flow of deposits and processing fees before going live.
- Use the uncategorized product to identify mismatches in cost codes or types.
- Regularly audit mappings to prevent errors from recurring.
- Check logs in JobTread’s unsynced records to identify and resolve errors.
And as we wrap up, keep these principles in mind:
- Start Simple: It’s tempting to build out a highly complex mapping structure from the get-go. Resist that urge. Start with a basic setup and add complexity only as needed. You can always refine your mappings over time.
- Test, Test, Test: Before you go live with your integration, run a few test transactions. Make sure bills, invoices, and time entries are flowing to the right accounts. A little upfront testing can prevent a lot of headaches later.
- Stay Vigilant: Integration issues have a way of creeping up over time. Make it a habit to check your uncategorized bucket in QuickBooks regularly. Catch and correct misalignments early, before they compound.
Having issues with your QuickBooks integration? Check out our troubleshooting article here. In our next article, we'll be creating our default document templates and standard proposal, change order, and billing workflows.